How to create a JAX-RS Jersey client application for consuming a REST service
In this blog post, I will be demonstrating how you can create a JAX-RS client application using Jersey JAX-RS client implementation.
What is JAX-RS and Jersey Client API?
JAX-RS is the Java specification for Restful web services. It is just a specification, it does not provide an implementation. Jersey is the reference implementation of JAX-RS specification. There are other implementations of JAX-RS like RESTEasy, etc The first release of JAX-RS was JAX-RS 1.0. It did not provide a client API. So vendors like Jersey, RESTEasy provided their own client APIs. JAX-RS 2.0 (which is the latest release of JAX-RS) provides a client API. The latest release of Jersey (2.25.1) implements this client API. So in addition to its proprietary client API, Jersey also implements the JAX-RS client API. While implementing a REST client that uses Jersey, it is better to use the JAX-RS specific client implementation and not Jersey’s client API. So even if the JAX-RS vendor is changed from Jersey to something else like RESTEasy, the code will still work.
How to create a JAX-RS client
Project creation and configuration
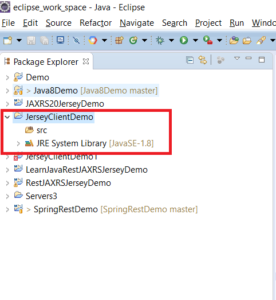
Step 1 – Create a new Java Project in Eclipse (Refer to this blog post). You should see a project as follows:
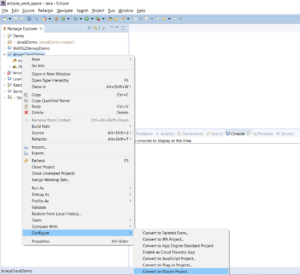
Step 2 – Convert to a Maven project.
Step 2a – Right Click on Project –> Configure –> Convert to Maven Project
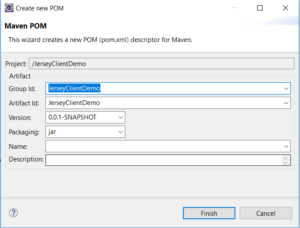
Step 2b – Click on finish
Step 3 – Add Maven dependencies to POM file.
Add the following:
  <dependencies>
   <dependency>
    <groupId>javax.ws.rs</groupId>
    <artifactId>javax.ws.rs-api</artifactId>
    <version>2.0.1</version>
</dependency>
   <dependency>
    <groupId>org.glassfish.jersey.core</groupId>
    <artifactId>jersey-client</artifactId>
    <version>2.25.1</version>
</dependency>
  </dependencies>
So your POM file will look as follows:

Write Code
Create a new Java class and write the following code:
public class JaxRsClientDemo {

  static String URI = "http://localhost:8080/RestJAXRSJerseyDemo/learnjava/myservice";

  public static void main(String args[]) {
  Client client = ClientBuilder.newClient();
  WebTarget target = client.target(URI);
  Invocation.Builder invocationBuilder = target.request();
  Response response = invocationBuilder.get();
  String responseStr = response.readEntity(String.class);
  System.out.println("Server Response:"+responseStr);
}
Test code
Step 1 – Ensure that a REST service is running. Refer to this blog post.
Step 2 – Run the JaxRsClientDemo as a java program. This will produce the following output on the console:

You can download the source code for this at the GitHub repository here.