Spring REST client using RestTemplate in Eclipse and Maven
In this article, I will be demonstrating how you can create a Spring REST client using RestTemplate. In order to see how you can create a simple Spring REST service, you can refer to this blog post.
Table Of Contents
What is Spring RESTTemplate?
Spring provides a class called RestTemplate. This is the starting point in creating a REST client application. It uses the URI and the HTTP method to invoke in order to connect to a REST service. It has several methods that allow you to invoke the HTTP methods on the specified URI
Project Creation
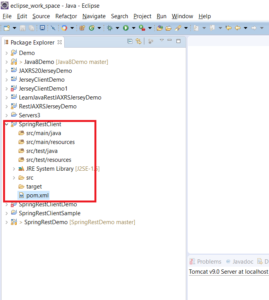
Step 1 – Create a Maven Project in Eclipse. You can refer to this blog post. You will get a project as follows:
Step 2 – Add dependencies to POM file.
Add the following to your pom.xml file:
<properties>
    <spring.framework>5.1.3.RELEASE</spring.framework>
    <spring.web>5.1.3.RELEASE</spring.web>
  </properties>
  <dependencies>
    <dependency>
      <groupId>org.springframework</groupId>
      <artifactId>spring-core</artifactId>
      <version>${spring.framework}</version>
    </dependency>
    <dependency>
      <groupId>org.springframework</groupId>
      <artifactId>spring-context</artifactId>
      <version>${spring.framework}</version>
    </dependency>
    <dependency>
      <groupId>org.codehaus.jackson</groupId>
      <artifactId>jackson-mapper-asl</artifactId>
      <version>1.9.4</version>
    </dependency>
    <dependency>
      <groupId>org.springframework</groupId>
      <artifactId>spring-web</artifactId>
      <version>${spring.web}</version>
    </dependency>
  </dependencies>
Code
Server code
Before we write the client code, we need to have a REST service which the client will invoke. Refer to this blog post in order to see how to create a simple REST service. Assume that we have a REST service as follows:
@RestController
public class HelloWorldController {
  @RequestMapping("/hello")
  public String helloWorld() {

    System.out.println("In HelloWorldController");
    String message = "Hello World";
    return message;
  }
}
Writing Code
Step 3 – Create a Java class as follows:
public class DemoClient {

  final static String ROOT_URI = "http://localhost:8080/SpringRestDemo/hello";

  public static void main(String[] args) {
    RestTemplate restTemplate = new RestTemplate();
    ResponseEntity<String> response = restTemplate.getForEntity(ROOT_URI, String.class);
    System.out.println("Response is "+response.getBody());

  }

}
Code Explanation
This code uses the RestTemplate class. It uses the getForEntitymethod.The restTemplate.getForEntity method accepts the server URI and a class instance of the data type that the server method returns. In this case, I’m using a String.class since the service that is being invoked returns String data. It returns a ResponseEntityof the data type that the server application returns. We can then use the responseEntity.getBodymethod to retrieve the actual response body from the ResponseEntity.
Just like the getForEntity, there are other methods available on the RestTemplate which you can use to execute the other HTTP methods like postForEntity, put, etc.
Testing
Step 4 – Ensure the Rest service is running at the http://localhost:8080/SpringRestDemo/hello URI.
Step 5 – Run the code. The following output should be seen on the console.
Response is Hello World
Further Learning
Spring MasterClass
Spring Tutorial For Beginners
Step by Step Spring MVC Tutorial
Spring Framework in Easy Steps
Conclusion
In this article, you saw how to create a Spring REST client using Eclipse and Maven. You saw how the Spring RESTTemplate example can be used to execute a GET Request.
You can download the complete source code from the Github repository here.